This post is written on visual studio online and is focused on how to prepare the environment to run Jekyll. Please note that I’m not an experienced person with Linux nor Ruby, so please keep that in mind and provide feedback if something is incorrect.
Visual Studio Online
Not to be confused with the original visual studio online, which was first renamed to Visual Studio Team Services before finally becoming Azure DEVOPS.
Visual Studio Online was first announced on November 4 and it is still in preview mode. The announcement by Nik Molnar provides the official explanation of what it really is.
Visual Studio Online provides managed, on-demand development environments that can be used for long-term projects, to quickly prototype a new feature, or for short-term tasks like reviewing pull requests. You can work with environments from anywhere using either Visual Studio Code, Visual Studio IDE (in private preview), or the included browser-based editor.
My explanation is that you can create an instance on-demand on Azure for development purposes that you can access by your browser or by your local Visual Studio Code. The environment has most of the popular tools along with the Visual Studio Code server installed. To access it from your local Visual Studio Code you need to install the Visual Studio Online extension.
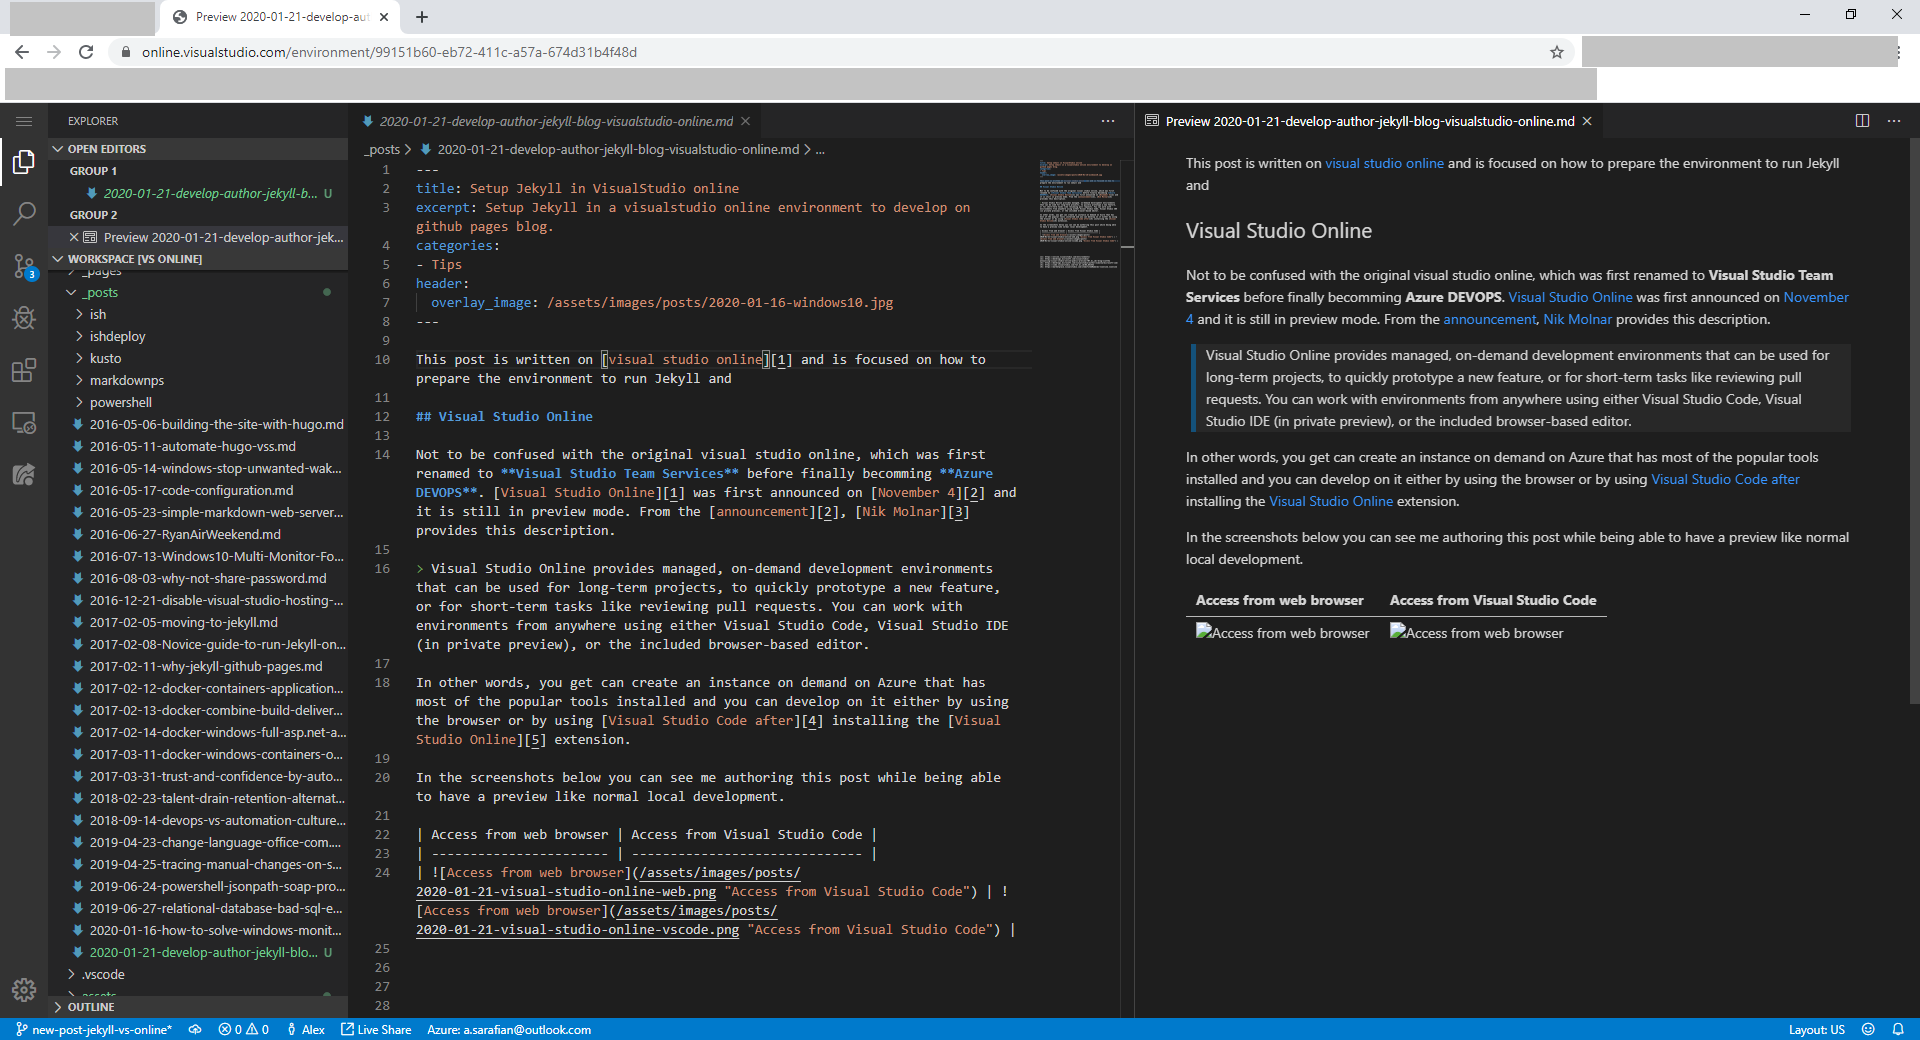
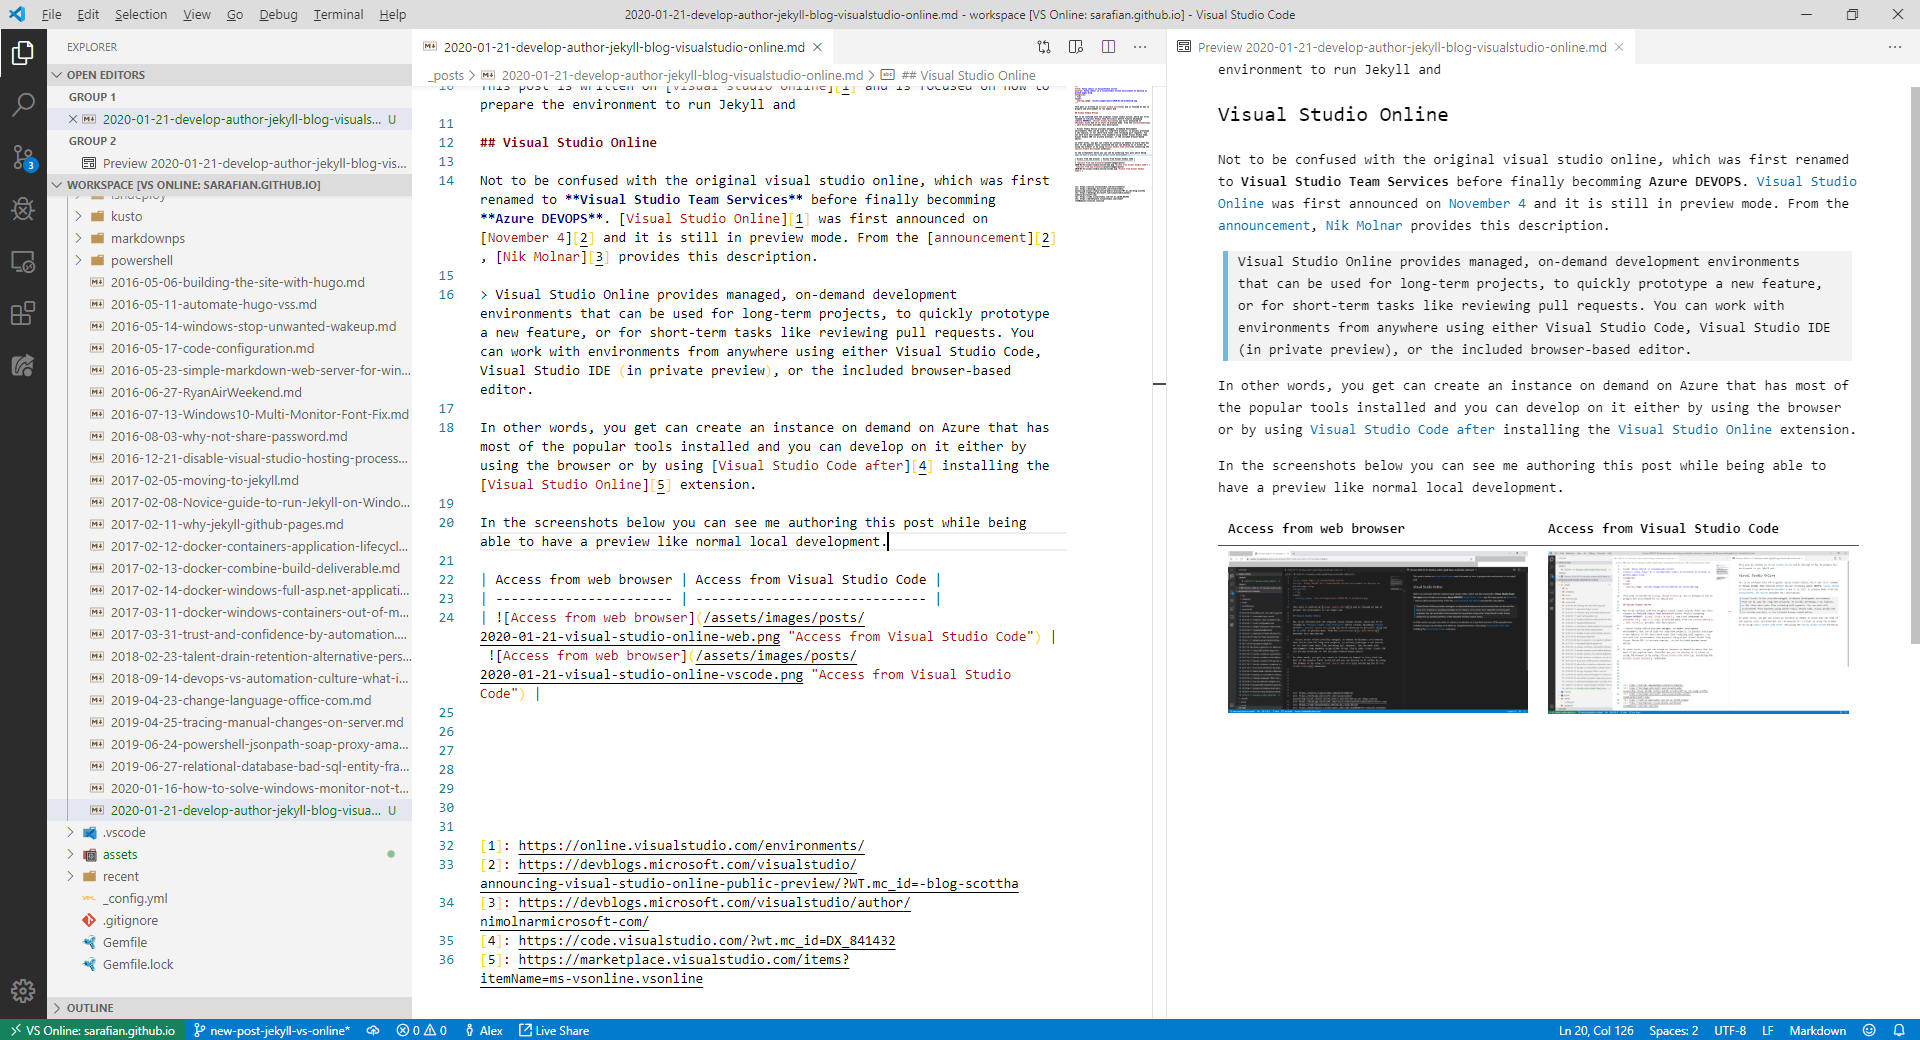
In the screenshots below you can see me authoring this post both from a browser and the local VSCode while being able to have a preview like normal local development.
| Access from web browser | Access from Visual Studio Code |
|---|---|
 |
 |
A couple of remarks:
- The pictures don’t render well on the markdown preview when using a Browser. This is because the pictures are referenced by a local path, which Jekyll will convert to actual URIs but the preview won’t. This works on github, so I hope it gets fixed before the official release.
- When using my Visual Studio Code, I get to use my selected skin.
The provided instance is a Debian GNU/Linux 9 (stretch). I believe the easiest way to describe the instance is to quote what the operating system reports.
vsonline:~/workspace$ cat /etc/*-release
PRETTY_NAME="Debian GNU/Linux 9 (stretch)"
NAME="Debian GNU/Linux"
VERSION_ID="9"
VERSION="9 (stretch)"
VERSION_CODENAME=stretch
ID=debian
HOME_URL="https://www.debian.org/"
SUPPORT_URL="https://www.debian.org/support"
BUG_REPORT_URL="https://bugs.debian.org/"
Upgrading Ruby for Jekyll with rbenv
if you probe for all installed packages (apt list) then you will find most of the necessary tooling already available. For Jekyll, we need to focus on Ruby and here are the packages available:
vsonline:~/workspace$ apt list ruby2*
Listing... Done
ruby2.3/oldstable 2.3.3-1+deb9u7 amd64
ruby2.3-dev/oldstable 2.3.3-1+deb9u7 amd64
ruby2.3-doc/oldstable 2.3.3-1+deb9u7 all
ruby2.3-tcltk/oldstable 2.3.3-1+deb9u7 amd64
ruby2.5/stable 2.5.5-3+deb10u1 amd64
ruby2.5-dev/stable 2.5.5-3+deb10u1 amd64
ruby2.5-doc/stable 2.5.5-3+deb10u1 all
Unfortunately this is not good because Jekyll requires Ruby 2.4. To install another version of Ruby we need to first install rbenv which becomes available by installing the ruby-build package.
From the terminal execute as root the following:
vsonline:~/workspace$ sudo apt install ruby-build -y
Once it finishes, check the current version of Ruby
vsonline:~/workspace$ ruby -v
ruby 2.3.3p222 (2016-11-21) [x86_64-linux-gnu]
Although I don’t understand exactly the reason, it seems to me that the installation of the ruby-build package activates the Ruby 2.3 version.
vsonline:~/workspace$ apt list ruby2*
Listing... Done
ruby2.3/oldstable,now 2.3.3-1+deb9u7 amd64 [installed,automatic]
ruby2.3-dev/oldstable 2.3.3-1+deb9u7 amd64
ruby2.3-doc/oldstable 2.3.3-1+deb9u7 all
ruby2.3-tcltk/oldstable 2.3.3-1+deb9u7 amd64
ruby2.5/stable 2.5.5-3+deb10u1 amd64
ruby2.5-dev/stable 2.5.5-3+deb10u1 amd64
ruby2.5-doc/stable 2.5.5-3+deb10u1 all
We will use the rbenv tool to install the 2.4 version. Notice that we are not installing as root. When I had done so, the 2.4 version was only available for root and was not usable from the normal user.
vsonline:~/workspace$ rbenv install 2.4.0
Downloading ruby-2.4.0.tar.bz2...
-> https://cache.ruby-lang.org/pub/ruby/2.4/ruby-2.4.0.tar.bz2
Installing ruby-2.4.0...
Installed ruby-2.4.0 to /home/vsonline/.rbenv/versions/2.4.0
When checking which versions are available, we see that 2.4.0 is available but not selected. The can be also verified by probing ruby for its executing version.
vsonline:~/workspace$ rbenv versions
* system (set by /home/vsonline/.rbenv/version)
  2.4.0
vsonline:~/workspace$ ruby -v
ruby 2.3.3p222 (2016-11-21) [x86_64-linux-gnu]
Unfortunately, the installation of the ruby-build package doesn’t leave some necessary steps out to properly use rbenv. For this reason, we need to do the following:
- Add the
rbenvshims path to thePATHenvironmental variable. - Initialize
rbenvwith therbenv initcommand.
We can add these steps in the ~/.bash_profile to make sure that they always execute when starting bash. The following block appends or creates the ~/.bash_profile.
vsonline:~/workspace$ echo 'export PATH="$HOME/.rbenv/shims:$PATH"' >> ~/.bash_profile
vsonline:~/workspace$ echo 'if which rbenv > /dev/null; then eval "$(rbenv init -)"; fi' >> ~/.bash_profile
To confirm execute
vsonline:~/workspace$ cat ~/.bash_profile
export PATH="$HOME/.rbenv/shims:$PATH"
if which rbenv > /dev/null; then eval "$(rbenv init -)"; fi
The commands have not executed yet. To do so we can start a new instance of bash or execute the ~/.bash_profile using the source command.
vsonline:~/workspace$ source ~/.bash_profile
To confirm execute
vsonline:~/workspace$ echo $PATH
/home/vsonline/.rbenv/shims:/home/vsonline/.rbenv/shims:/home/vsonline/.rbenv/shims:/home/vsonline/.dotnet:/home/vsonline/.dotnet:/home/vsonline/.vscode-remote/bin/26076a4de974ead31f97692a0d32f90d735645c0/bin:/home/vsonline/.dotnet:/home/vsonline/.dotnet:/usr/local/bin:/usr/bin:/bin:/usr/local/games:/usr/games:/opt/oryx:/opt/nodejs/lts/bin:/opt/python/latest/bin:/opt/yarn/stable/bin:/home/vsonline/.local/bin:/home/vsonline/.npm-global/bin:/opt/oryx:/opt/nodejs/lts/bin:/opt/python/latest/bin:/opt/yarn/stable/bin:/home/vsonline/.local/bin:/home/vsonline/.npm-global/bin:/opt/oryx:/opt/nodejs/lts/bin:/opt/python/latest/bin:/opt/yarn/stable/bin:/home/vsonline/.local/bin:/home/vsonline/.npm-global/bin:/opt/oryx:/opt/nodejs/lts/bin:/opt/python/latest/bin:/opt/yarn/stable/bin:/home/vsonline/.local/bin:/home/vsonline/.npm-global/bin
From Up and Running with rbenv by Ian Oxley
The job of the shims is to grab the directory for your desired version of Ruby and stick it at the beginning of your $PATH and then execute the corresponding binaries. rbenv requires you to install each version of Ruby in the ~/. rbenv/versions directory
We can use the rbenv which command to find which version is used when executing various ruby executables. For example, before changing the version it should be like this:
vsonline:~/workspace$ rbenv which ruby
/usr/bin/ruby
vsonline:~/workspace$ rbenv which gem
/usr/bin/gem
vsonline:~/workspace$ ruby -v
ruby 2.3.3p222 (2016-11-21) [x86_64-linux-gnu]
vsonline:~/workspace$ gem -v
2.5.2.1
To change the version of ruby we need to execute one of the following depending on our required scope:
rbenv global 2.4.0, for everything.rbenv local 2.4.0, for the current directory only.rbenv shell 2.4.0, for the activebashinstance only.
There is more information about rbenv on it’s github repository. Because we need to do more installations and configurations, I prefer to set the version to 2.4.0 globally. Execute the following command and then confirm that we are using the right version (2.4.0).
vsonline:~/workspace$ rbenv global 2.4.0
vsonline:~/workspace$ rbenv which ruby
/home/vsonline/.rbenv/versions/2.4.0/bin/ruby
vsonline:~/workspace$ ruby -v
ruby 2.4.0p0 (2016-12-24 revision 57164) [x86_64-linux]
vsonline:~/workspace$ gem -v
2.6.8
Before installing Jekyll we need to initialize the gem paths by creating the GEM_HOME environment variable and adding it’s bin to the PATH variable.
echo '# Install Ruby Gems to ~/gems' >> ~/.bashrc
echo 'export GEM_HOME=$HOME/gems' >> ~/.bashrc
echo 'export PATH=$HOME/gems/bin:$PATH' >> ~/.bashrc
Then execute the ~/.bashrc or restart bash.
vsonline:~/workspace$ source ~/.bashrc
Installing Jekyll and Bundler
At this point, if we would try to install the Jekyll and Bundler gems we would receive the following error:
ERROR:  Error installing jekyll:
        jekyll requires RubyGems version >= 2.7.0. Try 'gem update --system' to update RubyGems itself.
So we need to fist update gem as root and then install the Jekyll and Bundler gems.
vsonline:~/workspace$ sudo gem update --system
vsonline:~/workspace$ gem install jekyll bundler
Once complete, you can confirm the Jekyll version like this.
vsonline:~/workspace$ jekyll -v
NOTE: Gem::Specification#rubyforge_project= is deprecated with no replacement. It will be removed on or after 2019-12-01.
Gem::Specification#rubyforge_project= called from /home/vsonline/gems/specifications/em-websocket-0.5.1.gemspec:15.
jekyll 4.0.0
Using Jekyll to build a sample blog
Now let’s create a sample Jekyll blog as described in the Jekyll’s quickstart guide.
vsonline:~/workspace$ jekyll new myblog
vsonline:~/workspace/myblog$ cd myblog
vsonline:~/workspace/myblog$ bundle exec jekyll serve
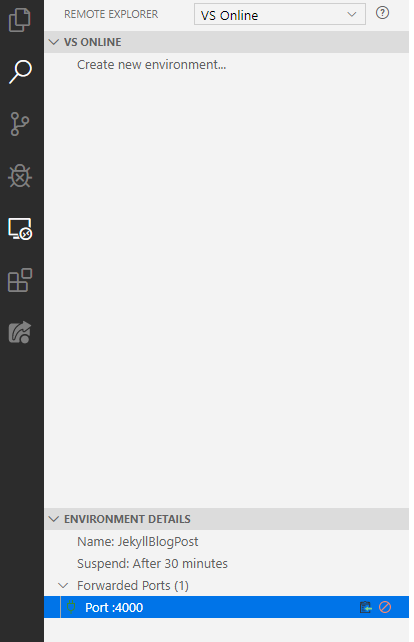
At this moment Jekyll is running locally on port 4000. To access the hosted website we first need to add 4000 to the forwarded ports. From the left, select the Remote Explorer and then add the port in the Environment details\Forwarded Ports.
From within Visual Studio Code

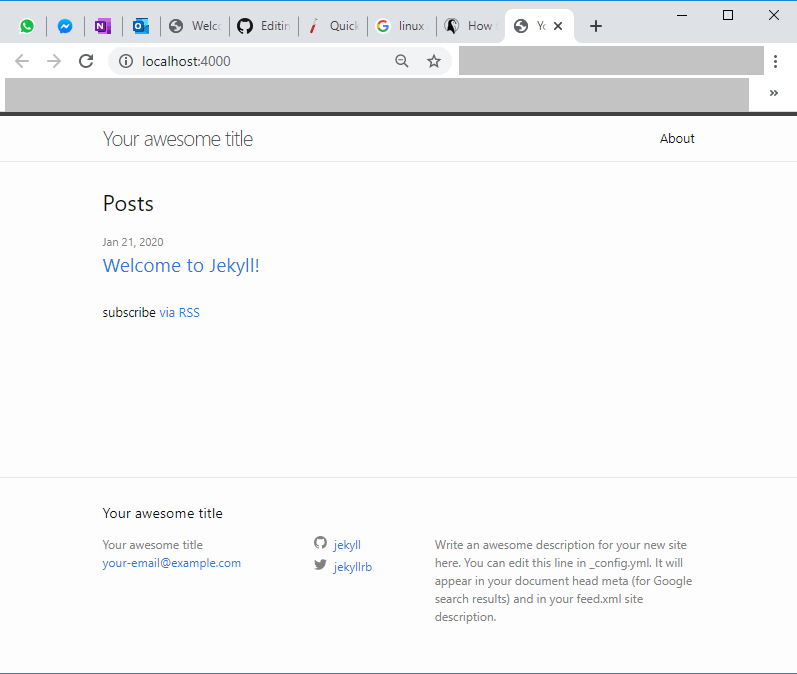
Click on the port and your browser opens with http://localhost:4000/ which shows the sample Jekyll blog we just created.

If you do the same from the Web Browser then your browser opens a url like https://d07a30268710cc1cb2ff97ddce980c0bb233-4000.app.online.visualstudio.com/ which renders the same site. If you want to use the website, then we need to tell Jekyll to use this hostname with the parameter -H or --host.
For example
vsonline:~/workspace/myblog$ bundle exec jekyll serve -h d07a30268710cc1cb2ff97ddce980c0bb233-4000.app.online.visualstudio.com
If you want to enable live reload then do the same for port 35729 as you did for port 4000.
Final words
This post was written and tested using a Visual Studio Online environment with Jekyll initialized as described. I’ve created a gist with a bash script that does all the above steps.
Because the environment has an inactivity timer it is a good idea to save often especially if you are needed away from your desk. Don’t forget that the instances cost money and are attached to an Azure subscription.
Overall, I find the Visual Studio Online amazing. It provides access to a development environment from any location with almost debugging features you can find in your local setup. Testing and experimenting are easy and most importantly without risk just like docker containers are but without containers which many people find difficult. As an example, for me to figure out how to make Jekyll available I had to experiment and make many mistakes. When I decided that this process was worth sharing as a blog post, I had to clear out my notes and steps and confirm that they work on a brand new environment. I did this a couple of times on an extra environment while using another one to author this post. And best of all, it is so cheap that is is almost free.
I’ll try to add some more posts with tips and tricks about using this amazing product.

Leave a Comment